How to use Document Matching with multiple document types
Within Document Matching, there is a possibility to match data to multiple document types. By using this, you can cross-check Excel data with multiple document types, such as bank statements and invoices.
About Document Matching
Document Matching let's you automatically match Excel data with supporting documents, such as invoices, bank statements, and contracts. This AI-powered feature will find the correct text, date and/or number in a source document, and then automatically creates a reference to your sample data.
Choose your DataSnipper version to learn more about Document Matching:
👉 DataSnipper version 4.1 and earlier
👉 DataSnipper version 5.0 and later
👉 Visit most FAQs on Document Matching
DataSnipper version 4.1 and earlier
Video tutorial
Adding Multiple document types
Selecting multiple document types adds additional validations in your test of detail. This can be done by looking up your sample data in more than one type of document. To achieve this you can segment the imported documents and add them into different document groups. After the groups have been created, you can assign the preferred columns where you need to place the Snips and match all rows.
Step-by-step
Prerequisites
- Received at least two different document types from the client
- Sample data ready in Microsoft Excel
- Determine the data fields you like to test
- DataSnipper version 4.1 and earlier
Start Document Matching
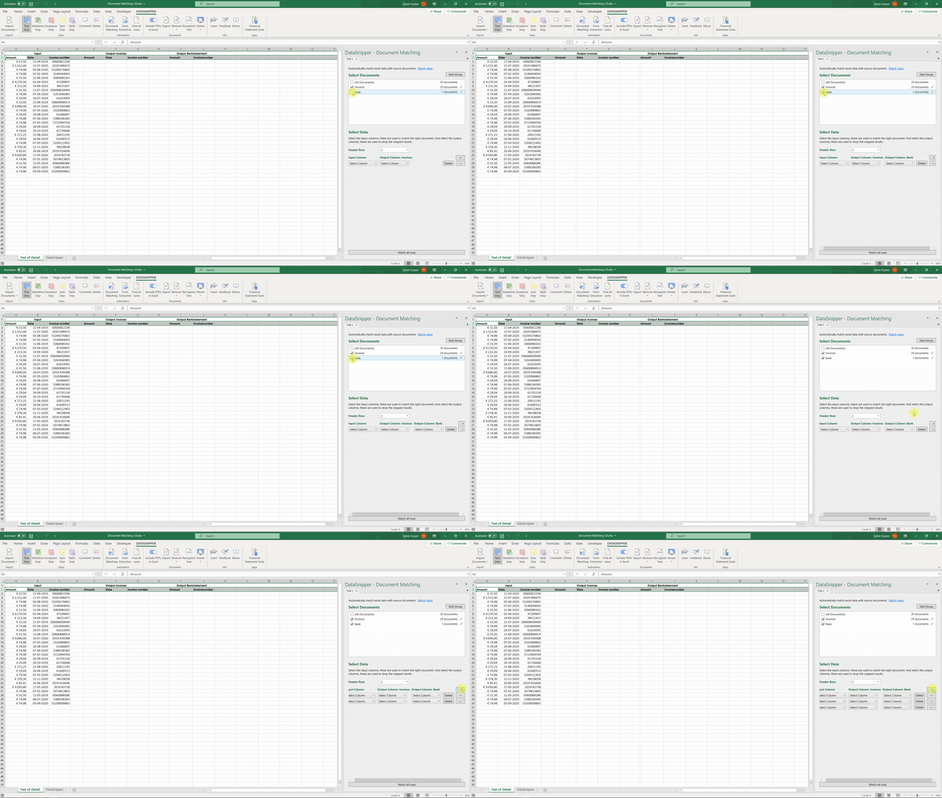
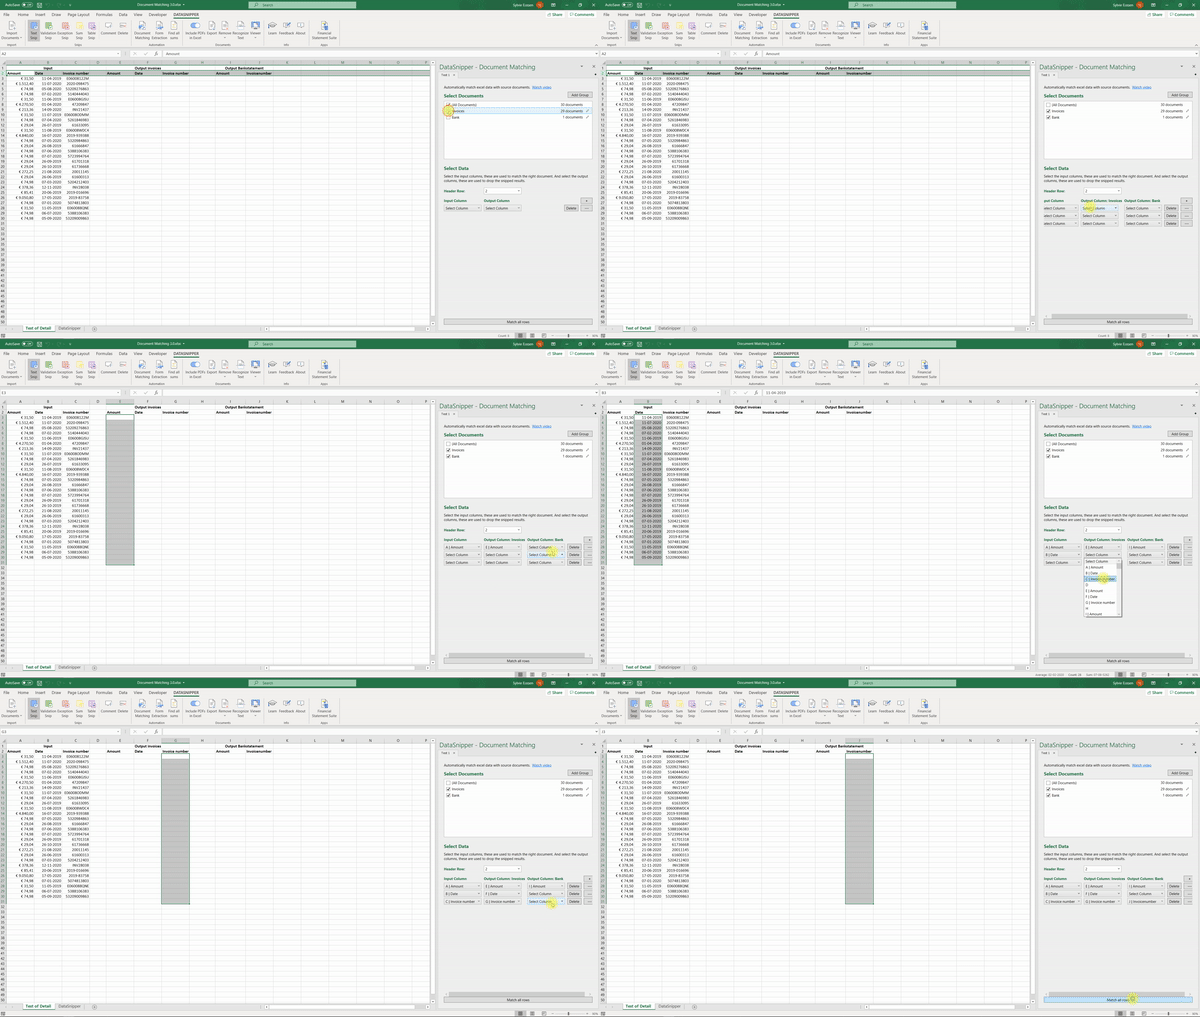
- Open the document matching panel and click Add group.
- You can now select existing documents or import documents into the group.
- Select the checkbox of the groups to create extra output columns.

- Select the header row. This is the row where the test starts.
- Set up the input and output columns.
- Click Match all rows.

- The matches that Datasnipper found will appear as text snips in the output columns of the Excel file.
.gif?width=483&name=ezgif.com-gif-maker%20(24).gif)
The matches appear in separate columns, different document types into several columns. Hovering over the results shows the linked results in the document viewer.
If you would like to add advanced options to strengthen your results, please read the article: How to use advanced document matching options
DataSnipper version v5.0 and later
Adding Multiple document types
Selecting multiple document types adds additional validations in your test of detail. This can be done by looking up your sample data in more than one type of document. To achieve this, you can use document folders to segment the imported documents. After the groups have been created, DataSnipper places the output columns and matches all rows.
Video tutorial
Step-by-step
Prerequisites
- Received at least two different document types from the client
- Sample data ready in Microsoft Excel
- Determine the data fields you like to test
- DataSnipper version 5.0 or later
Start Document Matching
- Start by importing documents. You can do that by clicking on the Import documents button or Document Organizer button.
- Once you have imported your documents, click on Document Extraction and click Start new Document Matching.
- Select the cells which contain your sample data. You can enter the cell numbers you want to match or hold and select all the cells with your cursor.
- If your sample data includes headers, check on the box "First row includes headers".
- Click on Next Step.
- Select how to reconcile your documents. If you are performing a multi-way match, select Use documents folders.
- Click add new folder to segment your documents into groups. Once you group your documents, check the boxes of folders you would like to use.
- Click Next.
- In version 5, DataSnipper will automatically select the output columns for you. You can always manually adjust them according to your procedure.
- After double-checking your output columns, click Match all rows and DataSnipper will automatically match the input and output columns for you.
- Once the match is complete, use your professional judgment to validate the results.
If you would like to add advanced options to strengthen your results, please read the article: How to use advanced document matching options
Saving Templates
If you would like to use the same Document Matching setup in the future for different documents, you can do so by saving it as a template.
- Click on Save as template.
- Give your template a name and a description (optional).
- Once you click OK, your template will be saved in the My Templates tab in Document Matching.
FAQs
- Can you include inputs in Document Matching without the tool having to output the snips in Excel?
No, Document Matching always returns the snip value on a document; you can always delete the output but it's not possible to create snips without outputting in Excel. In simple words, for each input you want to include in Document Matching, there should be an output.
If you are performing multiple-way matches (using doc groups) then you don’t need to specify an output for every single document group. - If the supporting documents (e.g. invoices) are 2-3 pages long, will Document Matching still pick up the correct inputs (e.g. let’s say the amount is located on the third page of the document)?
Yes, Document Matching has an algorithm which ranks multiple hits, one of the main ways of ranking is the proximity of all the snips on the page so generally this will work. - What happens if you select 'No' to the message 'The output area is not empty. Do you want to overwrite the rows that contain data?’?
If you select 'No', then Document matching will only populate empty rows. You can select this option for example when performing the next batch of sample items or if you want to revisit one of your Document Matching selections and then run the tool.